Thursday, December 27, 2012

Top 10 Projects of 2012--PLUS A BLOG HOP & GIVEAWAY!!

Welcome to the Top Ten of 2012 Blog Hop!  If you arrived here from Jennifer Haggerty's Blog then you are in the right place.  If you are just stopping by or arrived here from Practical Scrappers please head on back to Liz Chidester to start at the beginning --you won't want to miss out on the fabulous projects and prizes before me!  In case you get lost along the way below you will find list of the full blog hop to help you get back on track.

Liz Chidester http://thescrappiest.blogspot.com
Marcia Dehn Nix http://onescrapatatime-bymumsie.blogspot.com/
Monika Wright http://www.iloveitallwithmonikawright.com/
Ivanka Lentle http://ivankascardstudio.blogspot.com/
Christine Meyer http://scrappingwithchristine.blogspot.com/2012/12/my-top-ten-of-2012-plus-giveaway-and.html
Jamie Cripps http://jamielanedesigns.blogspot.com/2012/12/top-10-of-2012.html
Erin Morehouse http://girlpaperscissors.blogspot.ca/2012/12/top-ten-of-2012.htm
Melissa Elsner http://www.theprofoundbrunette.com/2012/12/top-ten-for-2012.html
Jodi Wilton http://luvalotland.blogspot.ca/
Sarah Hill http://sarahspaperbakery.blogspot.com/
Laurel Seabrook http://want2scrap.blogspot.ca/
Carrie Walz http://everydaymoments-carrie.blogspot.com/
Jen Matott http://arttalk-sigmagirl.blogspot.com/
Jan Tatomir http://www.jantatomir.blogspot.com/
Jennifer Haggerty http://livethemoment-jen.blogspot.com/
Kerri Yarus http://kerrikr8tions.blogspot.com/2012/12/top-10-projects-of-2012-plus-blog-hop.html
Ashley Nguyen Newell http://hearthugsdesigns.blogspot.com/2012/12/top-ten-blog-hop.html
Cathy Harper http://alteredplayground.blogspot.com/2012/12/top-ten-of-2012-blog-hop.html
Malika Kelly http://malikakelly.blogspot.com/
Lynn Shokoples http://scrappyhappymom.blogspot.com/2012/12/top-ten-of-2012-blog-hop.html
Kris Berc http://stashofprettypaper.blogspot.com/
Julie Tucker Wolek http://thetuckerwolekclan.blogspot.com/2012/12/my-top-projects-for-2012.html
Rhonda VanGinkel http://snapwhiz.blogspot.com/
Savannah O'Gwynn http://www.savannahland2.blogspot.com
Audrey Yeager http://audreysreflection.blogspot.com/
Katrina Hunt http://paperscissorsandglue.blogspot.com/2012/12/my-top-ten-of-2012-along-with-blog-hop.html

2012 came with a lot of ups and downs for me --scrappy wise.  I've been a working mom of three for a full 15 months now. Just when I thought I had my time management skills in check, life seemed to step in and throw me for another loop.  I am hoping 2013 will bring me  a little more time to catch up on my scrapbooking, keep this blog up to date, and venture out the way I always intended.  While I didn't do as much scrapbooking this year as I have in the past I did manage to put out some of my favorite projects ever--the time may not have been there, but that didn't stop my mind from working.
Here's a look at my top 10 projects of 2012...

PS...scroll through to the end to see how to qualify for my prize!!

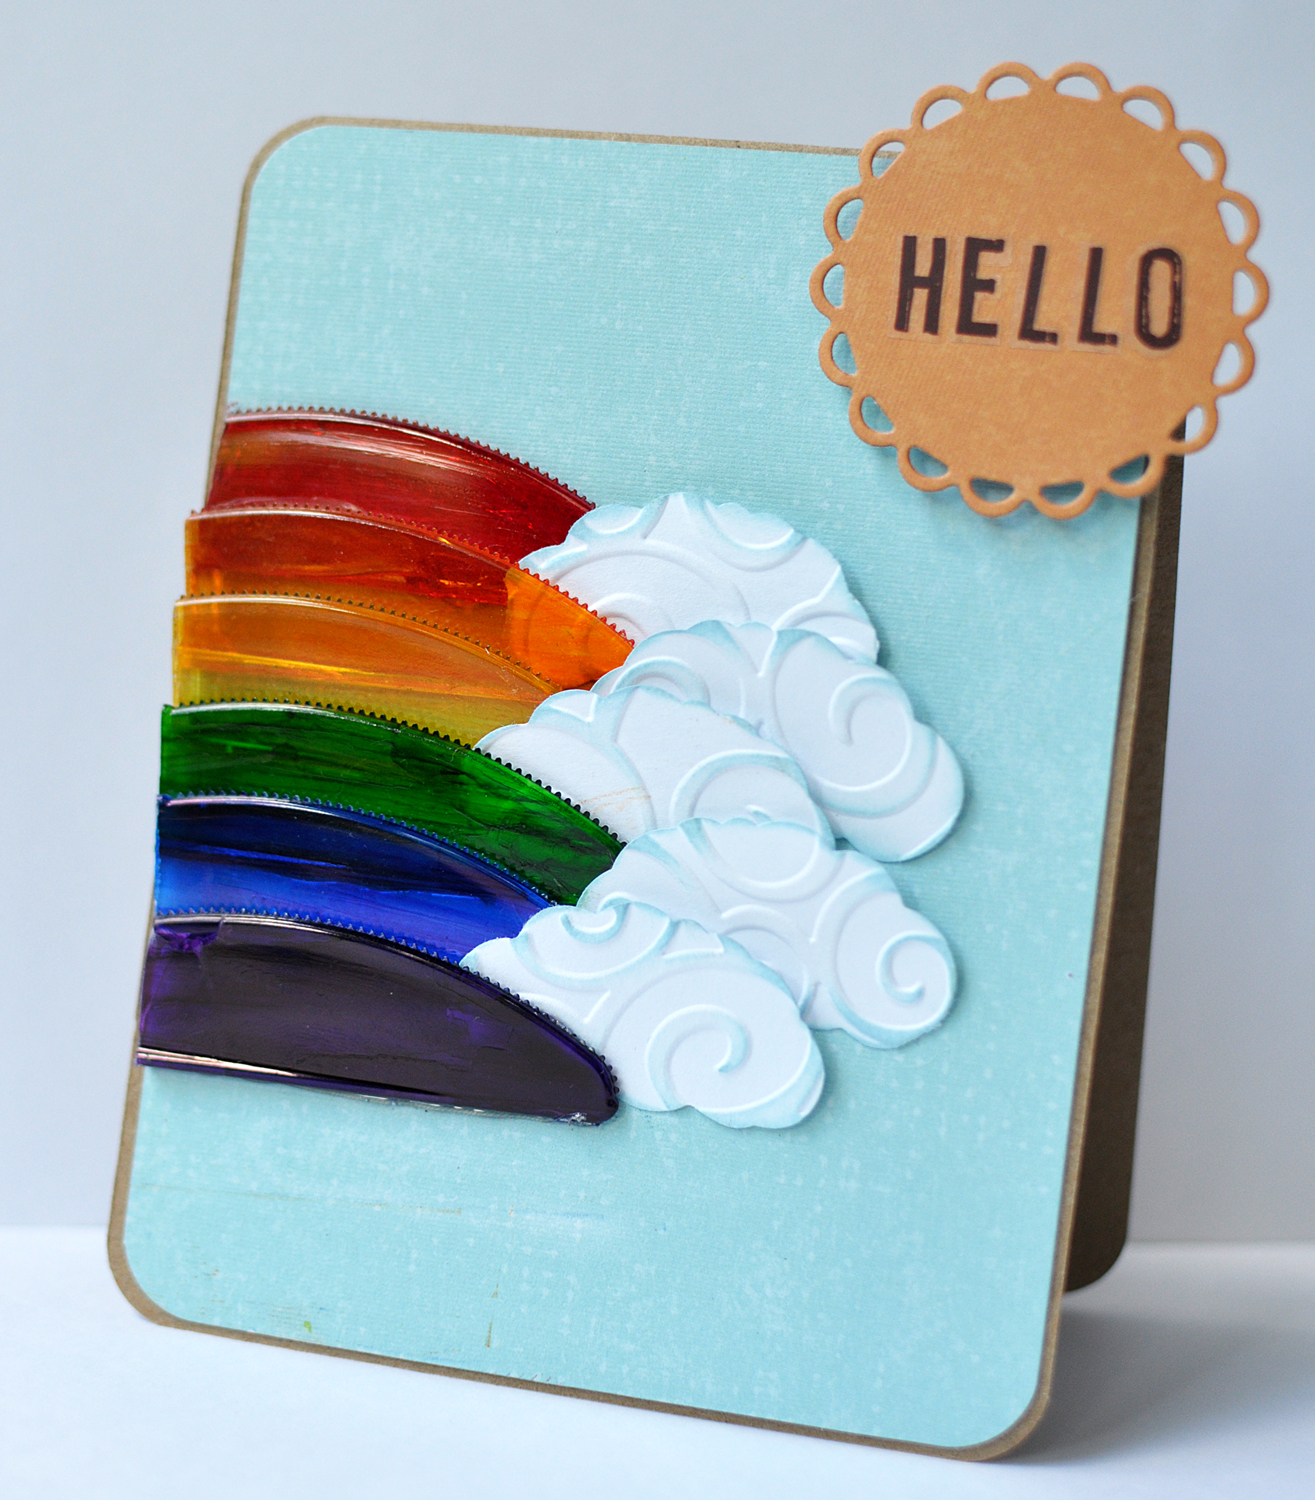
1.) Frugal Finds: Silverware (at Practical Scrappers)

 This is my favorite project of the year!!  Don't know how my brain came up with it except that I kept staring at plastic knives and all I envisioned was rainbows.
 
 
 It is a rare occasion that I scrapbook just the DH and myself without our kids, which is why this my 2nd favorite.  I also loved that I stepped away from my typical style and played around with trends I don't usually touch (misting and sewing)...however they are both on my 2013 to do more of especially since I got a brand new sewing machine :)
 
For those who know, they know Halloween is my favorite holiday, even more when it comes to decorating.  I made a lot of these this year and sold everyone I made at my craft fairs!
 
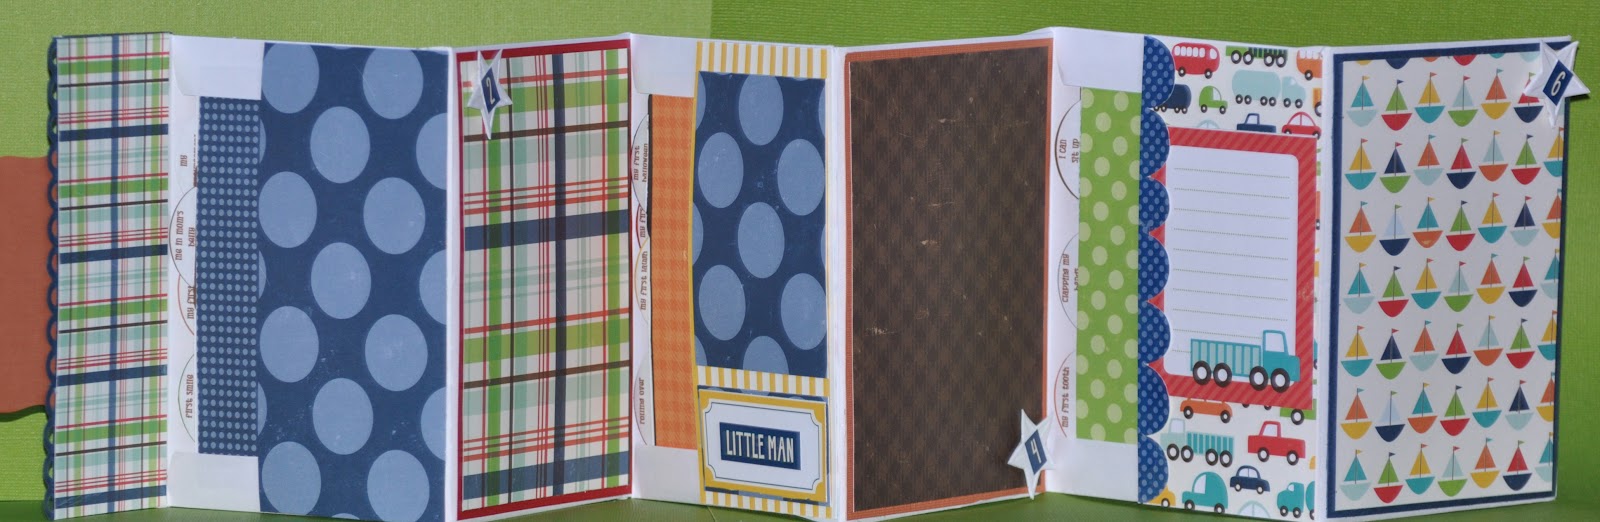
 Most of the items I made this year were either a gift for someone or I sold at a craft fair, none the less, I still love them.  There is nothing I love more that taking the time to create something special and unique for someone.  This was one of the most fun (and crazy) prrojects for me this year.  It is totally unqiue and I am still flabbergasted how I came up with the design of this mini. The fact that this baby stands on it's own to be displayed amazes me!
 This one made the top 10 for two reason: 
1.) I have fallen in love with this color combo of black, grey, and yellow.
2.) With the pressure for time and the desire to do some kind of scrapbooking, I have fallen in love with sketches all over again.  I stopped doing sketches about 2 years ago, but this year they have become my staple in getting things done.   
 
 This is another one of my own crazy designs that I fell in love with--again a gift for someone!
Hoping to make more of these for next year to sell at my craft fairs.
 Reminder:  Halloween is my FAVORITE  holiday!  This one makes the top 10 for another reason though--the photos!  My 12 year old isn't one who loves to have his photo taken.  Here was one of a few times where he just let loose, fell into character, and started acting/posing without mom prompting him :)
 
 When it comes to card making my favorite types of cards to make are shaped-shaker cards.  This one I designed for one of our feature days of sharing cards that used confetti.  I made my own circle confetti with a hole punch and filled op my shaker card.
 
 Frugal Finds is my favorite feature at Practical Scrappers!  I love using things in totally different ways than what they were intended.  This project makes my top ten for that very reason...I giving props to my originality on this one --painting my bobby pins and using them as the lines for my journaling.
 
This was one of my first projects I created in 2012 (actually was the first layout of 2012 for me).  This one make the top 10 for a number of reasons as well--I love the rolled flowers, the distressing, and that I finally took a stab at some therapeutic scrapbooking.  I never talked about it what I went through, and boy did it feel good to just see a perfect photo capturing those feelings and the writing the journaling. 
 
Hope you enjoyed my top 10 of 2012!  Before you hop on over to Ashley Nguyen Newell , I have prize package kit I put together for one random winner featuring one of my favorite manufacturers Crate Paper.  In order to qualify for my prize all you have to do is leave me a comment telling me what your #1 scrapbooking goal/resolution for 2013 before December 31, 2012 at 11:59 EST!  You have until 1 minute before the new year to figure out your 2013 scrappy goal!! 
 
Happy Hopping and New Year!


Monday, September 24, 2012

Happy Fall Y'All!!

Saturday was not only mine and the husband's 11th wedding anniversary, but it also kicked off the first day of fall.  Today over at Practical Scrappers, we are celebrating the first day of fall with fall theme cards and layouts.  Here's is my layout I created using Little Yellow Bicycle's "Hello Fall Collection" which I absolutely adore...

 
Thanks for stopping in today!  Make sure to head over to Practical Scrappers and check out all the other fall inspriation the ladies have up!
 
Kerri

Wednesday, September 19, 2012

More Frugal Finds!!

Over at Practical Scrappers, we have our monthly feature of our frugal finds edition going on!  This is my favorite feature!!!  Something about repurposing regular old everyday items brings out the best in my creativity.  Even though it was my choice for the item this month, I decided to let the team decide between the two so I did a poll.  After a very close race, jar lids won out.

Here are my two projects I came up with.  This first one is my new all time favorite layout.  It's not too often that I create one of me and the DH together (usually the kiddos get all the glory).  Saturday will be our 11th wedding anniversary and I made this as a gift for him.  I actually altered up a white wood shadow box that I did some dry brushing of red acrylic paint and sanded down with some light-weight sandpaper.

This is just the layout...I got a little crazy with using things I haven't touched in a long time like the sewing machine (probably a year since I sewed on a layout), stickles, mists, gesso, and even pulled out the white journaling pen!  I used my "mostest", "favoritest" ( yes, I know they aren't real words) paper manufacturer, Crate Paper.  All pattern papers in the layout are from the Peppermint Collection as well as the buttons, trims, and other embellishments.  I used American Crafts (Marquise) Thicker letters on for the title.  Mist is from Tattered Angels (Santa Baby Glimmer Mist). 
 
 close up of the jar lids
 
 the dimension shot:  I cut slits in the canning jart lid so it would slide down over top of the pickle jar lid.
 
This is not the greatest photo, but the best I can do late at night...sorry you get the shadow cast on the top. Here, you can see the frame I doctored up a bit.  I dry brushed some red acrylic paint on the edges of a white wood shadow box.  Took an old rag then quickly wiped it off.  Followed that up with some sanding with light-weight sandpaper.
 
 
The second project, I decided why not just use the entire jar!  I saw these similar item online when I was searching for items to make for craft fairs.  
 
What you will need:
1 can of Krylon Frosted Glass Spray (can but anywhere they sell spray paint or craft stores)
1 glass jar
1 LED battery operated tea light
wire
scraps of fleece/felt (hat)
ribbon
bell
snowman face parts (I cut on my Cricut)
hot glue gun
Glossy Accents
Crackle Accents
 
You can seen that this is a very simple projects and takes no time at all to put together.  It took my cricut longer to cut out all the faces than it did for me to put a dozen of these together.  First spray your jars.  The frosted glass only takes about 10 minutes to dry to touch. After that was dry I cut my wire and to rim of the jar to create the handle. I used Glossy Accents to adhere the face to the jar itself then also went over the eyes and mouth with the Glossy Accents.  For the nose, I also attached with Glossy Accents, but this time went over top of my diecut with the Crackle Accents to create those lines in the carrot nose ( you can see a close up of this below).  For the hat, I cut a 6 1/2" circle of fleece and hot glued to the lid.  I tied off the hat with some red ribbon. Added a little ribbon, twine, and bell to the handle then popped in a battery LED tea light ( making it safe to keep the hat on and use indoor and outdoor).
 
Here he is lit up
 
Close up of the Crackle nose which I just LOVE!!
 
Thanks for stopping in today and hope you enjoyed my projects!


Saturday, September 15, 2012

For An Inspiring Someone-- Another Baby Milestone Album!

So, I was at it again! Creating another one of my baby milestone albums. Glad I know lots of people having babies so I can create one of my favorite things (it's a good thing I have my files saved to cut down the amount of time). I can share this now that she got it, and I won't spoil the surprise! I followed my original design on milestone albums on this one, but scaled it down from using 5x7 envelopes to using your standard A2 (4 1/4" x 5 1/2") and I think I finally found the size I like!


For this album I started with 6 standard A2 envelopes and altered them Echo Park's "Little Boy Collection".  I kept the inside simple and basic because after all, Christine (my online friend and Practical Scrapper owner), is a scrappy genius herself and I wanted her to be able to add her own style to her album pages!

These are the best photos because I had to do at night and use the flash, plus I haven't figured out yet the best way to photograph these because of how long they end up opened up!

Cover of the album all folded up
 
 
0- 6 months all opened up
 
7-12 months all opened up
 
View of the milestone/pull out tabs. Each slot is broken down in 2 month increments and the milestone babies typically achieve during that time span.
 
Here is a look at some of the tabs pulled out.  Places for pictures that fit 3 1/2" by 5" photos.
 
Finally, here are the spots in the album for larger photos that will fit 4" x  5".  There is a place for a photo every 2 months (2, 4, 6, 8, 10 months, and 1 year).

Wednesday, August 22, 2012

Be(SILVER)ware!!

I am CRAZY in love with our Frugal Finds Feature over at Practical Scrappers.  How Christine, Erin, and I continue to out-do ourselves and inspire the ladies to create with things you would never think possible for scrapbooking and cardmaking blows me away.  The best part is, I don't know where I come up with my own ideas-- you never know where your crafting is going to take you. 

I have two projects to share.  This was the first one I created. I was inspired for this creation when, after Christine announced what her choice was.  Now I'll admit, I was not happy with her when she told us her choice -- even promised severe payback with my choice for next month (bwaa ha ha *note* my evil laugh). I found my groove and "dug right it".

Supplies:
Broken ends of plastic spoons (flower petals)
Cardstock: The Paper Company (kraft)
Pattern Paper: Crate Paper (Emma's Shoppe, Random, Seasons, & Peppermint Collections)
Tools: Cuttlebug
Dies: Provo Craft (maple leaf cut and emboss combo), Die-namics: rolled mum die,
Spellbinders: Lacey Squares
Stamps: Studio g (thanks so much)
Ink: Tsukineko VersaMagic Chalk Ink (red magic and hint of pesto),
 Copic Markers (Y06, Y08, Y17)
Bling: pearl from a random string of pearls
Hot Glue Gun

I cut off the ends of my spoons, colored with my copics to highlight the center of the flower, then hot glued them together to form a flower.  I placed the rolled mum in the center to hide the broken bases and topped that off with a little pearl.  For my leaves, I used the maple leaf cut and emboss combo die but I cut it up to only use one of the three points.

 
The second card I have up here I got a little crazy--no surprise there!  This one might be considered dangerous because even though it's plastic, but the fun I had creating this card is PRICELESS!! So much fun, that it is my new favorite all time project EVER, and I doubt I will surpass this (though I will try).  On this one, I used some clear pastic knives--take a look:


Supplies:
Cardstock: The Paper Company (kraft and white)
Pattern Paper: Little Yellow Bicycle "Hello Fall"
Ink: Studio g (light blue chalking ink),
Copic Markers (R35, YR04, Y17, G05, B29,V09)
Dies: Spellbinders (Lacey Circles)
Punches: EK Sucess- Cupcake punch (clouds)
Cuttlebug (D'vine Swirls Embossing Folder)
Brown Letter Stickers (unknown from a swap)
Clear Plastic Knives
Wire Cutters (cut off plastic knives)
Metal File (file sharp points of knives down)
Hot Glue Gun

I stared and stared at a box of clear plastic knives for at least two hours.  I even joked with the ladies on the design team (while chatting on facebook) that the only thing I could think to do with them was throw them across my office at the sytrofoam wreaths hanging from my office doorknob.  And no joke, I did take a few stabs at that due to mental block.  But the more and more I stared at them I saw the arch shape and thought of a rainbow. 

Coloring the spoons with my Copics worked so well with the spoons, I decided to give it another go with the clear plastic to get more of a stained glass/transparent look.  I colored each one of the serated ends first on the front side. Now, here's the trick!  When coloring on plastic, you have to be careful not to do too many layers.  It becomes streaky (you can kind of see it on the green), but it did trigger me to go back and color the other side to enhance the color (doing both front and back) which worked great for the blue and violet leaving no streaks at all!  Finally, I hot glued them down to my card and staggered the embossed clouds inbetween to get that 3-D effect.


Hope you enjoyed my silverware inspiration today!  You can head over to Practical Scrappers to see the rest of the gals' inspiration!

Tuesday, August 21, 2012

Family Flip Flop Mini Album

Today over at Practical Scrappers, we are doing our "10 thing to do with a..." feature.  This week's choice...the dreaded scoring board.  Most of you probably have one of these lying around espically if you are a card maker or a fan of the making boxes.  My project today is a mini album, a flip-flop mini to be exact.  You can find the instructions for this over at the Scor-Pal website.  This was one of the first projects outside of a scraopbook page, I ever learn how to create back in 2007.  I decided it was time to revisit the past and redo what was done then.  Now I did changed mine up a bit.  Instead of making the larger tags giving you only a front and back, I made it a pull out tag giving you double the place for pictures and journaling (two out outside, and a two on the pull out tag).


album cover

album open

one of the pull-out tag sections...these areas will fit a 2 1/2" x 3 1/2" photo

Supplies:
2 pieces of Chipboard 6 1/4"x 6 1/4" (light weight--I used recycled cereal boxes)
Cardstock: The Paper Company (kraft)
Pattern Paper: Crate Paper (Restoration Collection)
Embellishments: Crate Paper Chipboard and Cardstock (Restoration Collection)
Ribbon: Crate Paper (Static Collection) 
Ink: Versa Mark ( Jumbo Java Chalking Ink), Staz-on Timber Brown
Punches: Martha Stewart
Bling: Studio 18
Stamps: Autumn Leaves (journaling lines)

 
Thanks for stopping in today.  Make sure you head over to Practical Scrappers to see what the rest of the ladies came up with for using their scoring board.  Also, if you scroll down to the post below, you will find my second project that I made some envelopes using my scoring board. 

Happy Scrapping!!

Monday, August 20, 2012

Purse Note Card Holders

It's crunch time and I am trying to see how much product I can get done before school starts next Tuesday.  Today, I decided I was going to make some mini note card holder sets that hold 4 note cards and 4 envelopes. 
All closed up

Here is the box and one of the envelopes.  I create them using my Scor-Pal. I got the instructions on how to create them right from the Scor-Pal website here, but I went from the 4x4 notecard and had to adjust my measurements.  I cut my cardstock to 6 1/2" x 6 1/2".  Using the 6 3/8" marker I scored at 4 1/2".  It give you a 3 3/4" envelope for a 3 1/2 card. 

Photo of the notecard, envelope, and purse box.

Last one...here you can see the purse open with the cards and envelopes fitted in it.  I used a velcro square to close it shut.  You can find the pattern for this shaped card and purse box at My Scrap Chick in their 30 boxes and more set of SVG's.  The paper used on this set comes from My Mind's Eye "So Sophia".

Wednesday, August 15, 2012

New Fall Wreath

Just finished this one up this morning. Working on some more craft fair stuff and decided I needed a fall theme wreath. The kids want to keep this one because they think the owl is too cute to sell!

Supplies:
Pattern Paper:  Little Yellow Bicycle "Hello Fall Collection"
Creative Memories Complete Cutting System (circle and oval)
Creative Memories Letter Stickers
Stampin' Up Owl Punch
Versa Mark Jumbo Java Chalking Ink
Tuelle (brown, orange, tan, olive green)
Craft Essentials Brown Ribbon (1")
Goggle Eyes (5/8")
Hot Glue Gun

Tuesday, August 14, 2012

Bewitching!

I am playing along in a challenge for the first time , oh I'd say in probably a year, at DCWV blog with their August Stack-a-holics Challenge

Here's my Layout:


This was the original sketch that came from Sketch Savvy:


I decided to flip the sketch sideways so I could use the fabulous witch paper in the new "The Bewitched Stack".  All of my papers come from this new Halloween line.  Used some American Crafts glitter Thickers, a black Gelly Roll pen, and some Studio g black chalking ink to finish it all off.

Thanks for stopping in and happy crafting!

Monday, August 13, 2012

Calendar Swap

Just sharing a quick project I made-- actually it wasn't that quick because I did 12 of them. Every year I play along with all my SAS sisters on the for our yearly calendar swap. We do 6x6 layouts for each month. These really make a great gift or your own personal desk calendar for your scrappy space. I have October because Halloween is my favorite season to scrap! Here's what my little calendars look like...

Supplies:
Pattern Paper: DCWV "The Halloween and Fall Value Stack"
Cardstock: DCWV
Cuttlebug and dies:  (cat and spiders)
Embossing Folders: Diamonds and Spider Web
Nestabilities: Label 16
black foral wire
DYMO label maker

Monday, August 6, 2012

WINNER...and a few new projects!!

First up, we celebrated our three year anniversary at Practical Scrappers over the weekend!!  WOO HOO!!  Can't believe it's been that long already. 

Congrats to the winner of our anniversary giveaway: Kristie Maynard! Kristie please email us at practicalscrappers@gmail.com with your address.

Kristie is the winner of this fabulous prize package from the administration team!


Onto a few new things!  I posted  some Christmas projects yesterday...don't worry didn't forget about Halloween coming first.  Here are two Halloween projects.


Supplies:
Authentique: Glowing Collection
Tattered Angels Glimmer Mist (graphite)
American Crafts Thickers Letter stickers
Orange and Black Tuelle
Ribbon


Supplies:
DCWV "Bewitched" and "The 2012 Halloween and Fall" Stacks
DCWV Black Cardstock
EK Success Bat border punch
American Crafts Thickers Letter Stickers
Gelly Roll Black Pen
StazOn Jet Black Ink
Autumn Leaves Journal Lines Stamp


Happy Crafting!


Sunday, August 5, 2012

Too Early For Christmas?

Not in my book is it too early for Christmas!  With the school quickly approaching which means back to work for me, crafting time will be very limited!  I'm getting a jump start on my holiday craft fair projects this year--no waiting til the last minute this year.  Here are two of the five wreaths I've made over the weekend.  I really enjoy making them and they don't take a lot of time at all.  I've got it down to 52 minutes start to finish.

*pattern paper and chipboard embellishments used here are from Crate Paper-
"Snow Day Collection"


You'll see a lot of different methods out there to make these curled paper wreaths.  They all work, this was just my preference.

Supplies:
1 - 10" styrofoam wreath ( has to be the hard smooth foam, not the kind the sheds when you touch it)
6 -12" x 12" sheets of pattern paper (doesn't have to be double sided)
1 -box of dress/straight pins (the ones with the flat metal head that look like a nail)
paper trimmer
 bone folder
tulle/ribbon

I started by cutting my paper to 1/2" strips (getting 24 strips per sheet of pattern paper).  Once all were cut I used my bone folder and curled my paper just as you would with scissor with curling ribbon.  Start in the center of  1/2" x 12" strip and curl to one end, then do the other. It will look like two loops meeting each other at the center.  After they are all curled you can design as you like, you can see in my first one I used 6 different pattern papers and kept each pattern together.  One the second one I used three different pattern papers (2 of each sheet) and scattered them throughout. One thing to note:  double sided papers are a little harder to curl (depending on the brand/manufacturer) and you may have to curl each strip twice.  However, they make wreaths that are much fuller while the single sided papers make a tighter curled wreath.  You can see how the top wreath I made using my favorite manufacturer (Crate Paper--Snow Day Collection) is more full and the empty space in the center of wreath is smaller than the second wreath.  Both look great, and I actually like the white on the back of single sided paper showing in spots because it breaks up the patterns in spaces.

Thanks for stopping in!
~Kerri

Wednesday, July 11, 2012

A Little Picky??

I have two projects to share with you today for our monthly frugal finds feature over at Practical Scrappers. Today, the ladies and I are using toothpicks. They were a lot of fun to do!  I did have a meltdown while creating my layout and ripped the entire project apart, but it was all for the good.  It also inspired some more crafty ideas on how I could use those little picks!

On this layout, I placed two round toothpicks together and wrapped a double layer of Martha Stewart twine around them to create my flagpole embellishment! By the way, this layout is well over due!  This weekend will mark a year ago that Layton took his journey to Canada!

 
Here I went for the not so obvious! Not only can you use them to embellish, but you can use them as a tool! I took a stab at quilling on this card.  Here I used my round toothpicks to roll  the pattern paper strips around the toothpick to create her flower petals and leaves. Not only did they do the rolling, but I used them to apply the glue to the rolled petals and leaves.

Tuesday, June 26, 2012

How To Use Your Embossing Folders!

It's a new "10 ways to use your..." at Practical Scrappers and today's focus is embossing folders.  I could fill the entire segment with ways to use them, but I went with two that really call to me. 

First up is inking your embossing folder first then running through your embossing machine.  This one for me is always a lot of fun.  I like to create messes :)  Tried something different this time by using more than one color and decided to go patriotic with the 4th of July just around the corner.


Also wanted to show you some up close shots of my ebellishments and edging of the card.  With the ink giving the card that faded look because it's heavier in some spot than others I decided to pull out my Crackle Accents to continue that faded worn look.


and here's the bacjground layer that I crackled as well...


The second technique I used with my embossing folders is one because I am lazy and highly dislike rub-ons that was until I found this little trick.  Create a "sandwich stack" to run through your Cuttlebug (I don't have the other plates for other diecut and embossing machines but I'm sure all you crafty ladies can adjust as needed).  The sandwich stack for the Cuttlebug goes as follow working from the bottom up:  Plate A, Plate B, cardstock, rub-on, empty embossing folder, Plate B.  The embossing folder works as just an extra shim to apply the exact amount of pressure needed to apply the rub-on without any rubbing! Here's my card...

The best part about this technique is that works great on those textured, glossy finish, and glittered cardstock allowing your use those papers that you thought were not "rub-on friendly".


Thanks for stopping in today...and if my blog was your first stop today make sure you head over to Practical Scrappers for some more great ideas on how to use your embossing folder!


LinkWithin

Related Posts with Thumbnails