Saturday, December 10, 2011

Snowman Soup

  Today is my day to share a holiday project idea at Practical Scrappers, and here's what I came up with-- my altered to go insulated coffee cups. I found these to go cups at my local Joann's in their bargain bins for $2.50 each ( and I used my coupon to over the holiday to get another 20% off ). These cups I made for my kids' teachers to go with the other little gift I made for them. 

These were super easy to make! When I got the cups they had another piece of paper in them. I traced them on my favorite paper (Crate Paper -Snow Day Collection) and embellished with the matching chipboard, cardstock cut outs, and cardstock borders.


Here's a look at just one of the cups up close. Next, I filled each cup with a package of hot chocolate mix, a bag of mini marshmallows, and added a Wilton peppermint swirl candy cane which you can see down below.


Finally, I made my little "snowman soup" tag. Now, there are a couple of different poems out there for "snowman soup", but I picked the one I liked best and printed it out. Here's an up close picture of the tag which reads:

Was told you've been real good this year
Always glad to hear it!
With freezing weather drawing near,
You'll need to warm the spirit!
So here's a little Snowman Soup
complete with stirring stick.
Add hot water, sip it slow,
It's sure to do the trick!


Again, these are super quick and easy gifts that are great for teachers, secret Santa exchanges, friends, or just anyone that you want warm their spirit this holiday season. Thanks for stopping in and don't forget, only 14 more shopping days left!

Follow Me on Pinterest

Thursday, October 13, 2011

Halloween Fun

Halloween is my favorite time of year to craft for and I've been busy doing so. Here are some of my favorite Halloween projects I've done so far ...


Photobucket


Photobucket


Photobucket


Photobucket


Follow Me on Pinterest

Saturday, October 1, 2011

Make it PINK!!

October marks the beginning of Breast Cancer Awareness and the importance of it is very dear to me (having a scare myself). It struck even closer though this past year to my husband and I when I co-worker of his was diagnosed at 33 years old. Just goes to show you age doesn't matter. Today also kicks off our first ever card contest at Practical Scrappers. It's been a huge turn out and I'm so excited to see how our contenders do with our challenges over the next six weeks. But this first round the theme is PINK and the perfect color for a breast cancer awareness card...


Materials used:

cardstock: The Paper Company
Pattern Paper:  Crate Paper, Blue Hill Collection
Embellishments: Crate Paper Blue Hill Collection chipboard buttons & shapes, and cut-outs
Bling: Basic Grey, opaline designer half pearls
Ink: Martha Stewart, Geranium chalking ink

Tulle
Electronic Cutter: Cricut Expressions, Provocraft
Software: SCAL 2.0
Cuttlebug, Provocraft 
D'Vine Swirls Embossing Folder, Provocraft


Thursday, September 15, 2011

Authentique Giveaway!!

Hello everyone--life has been absloutely crazy, and I haven't blogged in awhile now. But, I wanted to stop in today to tell you all about a fabulous giveaway from Authentique on Practical Scrappers. I've just ordered my first Authentique Collection myself (The Glowing Collection, being the Halloween addict I am) and cannot wait to get it to play with! Just click on the Practical Scrappers Banner below to find out all the details!


Monday, August 22, 2011

Card Using Die Cut

Hi Everyone...Today at Practical Scrappers we are featuring cards using Die Cuts.  I made 8 of these wedding shaker cards ( getting ready for the craft fairs still) and this is probably one of my favorite cards I've made.


 I cut the champagne glasses with a free SVG I found from Lea.  What I did was cut the  3 of the shadow of the glasses- 2 on  white card stock and 1 one from a tranparency.  Then I  cut one of each of the peices from the svg file and used the piece that was supposed to be the champagne in the glass.  I traced that on one of the shadow pieces I cut on the white cardstock and hand cut that with my exacto knife.  I then glue that piece to the top of the the cut transparency.  Here where I create the shaker part:  I used my Scotch's foam mounting tape and place it along the entire "bowl" of the glass. I then filled that with glitter, removed the backing off the tape, and added the second white cardstock shadow of the glasses to create the back.  When that was all put together, I added some diamond stickles to the front to dress it up.  Also, the black scroll was a die cut I cut from my Cricut (storybook cartridge).

Thanks for stopping in!

Thursday, August 11, 2011

**NEW** Mini Album

Today at Practical Scrappers we are featuring one of my most things to create--mini albums.  Most of the time I usually create mini word albums, but this time I tried out something I've never done before and that is use paper bags as my album pages.  This was a lot of fun and very easy to assemble- probably the quickest I've ever put a mini together.  Here's a look at the it...

front cover
For the cover, I used cardboard that I covered.  Other paper bag mini's I've seen have a 1 inch binding.  Well, if you are like me then go at least 2 inches.  I ended up cutting my original binding (it was all the pink pattern paper) and having to create a new one with some thin chipboard I then covered. The blank tag is for the year--haven't decided if I am keeping, selling, or giving this as a gift yet so it's all blank!

all the pages

 some of the inside pages ( I only shared my favorites, but this is most of them)
You can see one of the insert I made in the first picture.  I varied it up with, pull-outs for pics, journaling, tags, but there are 15 of them total.   

Now this was something fun I wanted to share....this is an up-close picture of the back of an adhesive back chipboard embellishment that I cover with flocking.  It was a great way to give it a finished look while keeping it from sticking to the other page when the album is closed.  I also used glitter to do some of the other chipboard pieces I had "hanging over the edge".

Hope you enjoyed!

Tuesday, August 9, 2011

Practical Scrapper Blog Hop Winners!

The Anniversary week is all over with and we are now 2!  Hope everyone had a great time on the blog hop and got some great inspiration along the way!  My practical sisters surely inspired be along the way and there are definitely some things I want to try after checking out all of their projects!

So here is the deal I'm switching up my prizes a bit because I want to reward those who entered my challenge....I only had two entries (how fitting for a two year anniversary), so both of Marie and Kathy P please email at klyarus@verizon.net with your address and I will mail both of you a RAK package of Crate Paper goodies.

So now instead for my followers and PS follower RAK I am giving the MS punch combo... here's the WINNER....


There were 31 items in your list. Here they are in random order:


1.15.) Amber Hall

2.19.) Claude

3.21.) kimberly

4.30.) Kelly G

5.11.) Scrappin' Diva

6.9.) Lori Apgar

7.3.) dlwidder

8.18.) Cyndi 56

9.2.) Faye Marie

10.16.) Tracey

11.26.) Patricia

12.24.) Nicolle

13.6.) Pia

14.17.) Ann Jobes

15.10.) Stacie(craft-princess)

16.14.) Jessica (14)

17.28.) Kim

18.31.) Jennifer

19.1.) Mara

20.13.) MomCleo

21.7.) Carolina

22.5.) Marie

23.22.) Betty Ann

24.8.) Jessica (8)

25.25.) Babe O'Mara

26.4.) Karen AKA Soccerboyzmom

27.23.) Kray

28.29.) Cozy Crop House

29.20.) Kathy

30.12.) Kylie

31.27.) Rosemary

Timestamp: 2011-08-10 02:51:33 UTC

Congrats AMBER HALL! email me at klyarus@verizon.net with your mailing address and I will get that out to you!

Congrats to all!

Sunday, August 7, 2011

Practical Scrappers Blog Hop!

* NOTE:  THIS POST WILL REMAIN AT THE TOP FOR THE WEEKEND*

Thanks for joining us for the Practical Scrappers Blog Hop-you are in for some fun this weekend!   If you came directly hop back on over to Practical Scrappers so you don't miss out on other chances to win prizes.  If you came here from Christine's  blog then you are in the right place. The blog hop begins at 12:01 EST Friday August 5th and ends Sunday August 7th at 11:59pm.  All of our designers are sharing projects that relate to the number two since it's our second anniversary! Today, I'm sharing TWO projects with you.  I've got TWO prizes to give away to TWO of you.
For the first RAK (some Crate Paper goodies--my favorite manufacturer) all you have to do to qualify is become a follower of both Practical Scrappers and My Blog.  Leave me a comment here telling me here that you were here and are a follower at both.
For the second RAK ( I have a set of 2  Martha Stewart punches-- ABC123 border punch and 3 star corner punch).  To qualify for this prize you must:
1) be a follower at both Practical Scrappers and My Blog
2.) complete my two challenge, which all it is to create TWO projects.  It can be two cards, two layouts, two altered items, or any combo ( 1 LO and 1 card, 1 card and 1 altered item, etc...). Leave me a comment (NOTE: I've updated this and you can now just link your projects in the INLINKZ below) here with a link to your two projects so can check them out!

Here's the list of the full blog hop:
Christine
Kerri You Are Here
 Erin Go Here Next
Jessica

And now.....for my TWO projects :)


Here are TWO card sets I made.


The first one up; a few weeks ago I made a popsicle stick card.  I thought they were so cute I decided to made a card set to sell at my craft fairs I do.  This is my fruity version.  I did TWO of each color.  I paper pierced the lemons, limes, and oranges and added some glossy accents to them.


The second one here is another gift card set, but this one is an All Occasion set to sell.  It has TWO thank cards, TWO happy birthday cards, and TWO friendship cards.  Also, with this set I only used TWO pieces of pattern paper to create all of it (including the box).


Thank you so much for visiting me today!  Hop on over to see my practical friend ERIN next!


Thursday, August 4, 2011

Cotton Projects

Hi All!  Just getting a chance to post these--it's been a crazy day! A bathroom project that should have been a quick fix is turning into some major remodeling...I hate house projects!! Today at Practical Scrappers we are doing a version of our monthly frugal finds with all the designers.  We challenged our design team to use COTTON ( and shape, version, form of it) to create any kind of project.  We picked COTTON because of the significance that you are supposed to give cotton gifts for 2nd wedding anniversaries.  Here are the two that I came up with...

This one I used cotton medical gauze from my first aid kit I have in that dreadful bathroom I was complaining about.  I spruced it up by inking with Tim Holtz Vintage Photo distressing ink ( I could really use some de-stressing right now) and Sugar Maple Glimmer Mist by Tattered Angels.  All the pattern paper is by Crate Paper, Restoration Collection.

Here's a photo of my "cotton" gauze flower up close.


This is the other flower that I had just had to share a close up of because I loved how it turned out!  I cut 4 some "blob"/flower shapes by hand (don't have to be the same size). I cut a little "v" into into each bump/petal.  Inked with Tim Holtz Vintage photo distressing ink again.  I then place them in a blow of warm water to help break the fibers down and crinkled up.  While they were still wet I dipped the edges into to some Beacon's glue and dumped glitter over the glue.  To finish, I shaped it with my fingers  while drying with my heat gun (CAREFULLY).  I just LOVE it!! 


Here, I created this altered canvas for my parents (canvas made of cotton) that I painted with black acrylic paint and glimmer misted like crazy on (Tatter Angels Graphite and Marshmallow). All pattern paper, embellies, ribbon/fabric are from Bo Bunny Whoo-ligans Collection that included some cotton fabric (black and white check) I created her bow with.  Hope my mom doesn't mind that I put it on my blog--I did promise not to post it on FB for all her friends to see :)

Thanks for stopping in and make sure you check back at 12:01 am !!  Our blog hop begins and lots of fun in store!

Sunday, July 31, 2011

Happy 2nd Anniversary Practical Scrappers!


Wishing a very Happy Anniversary to Practical Scrappers!  This week we turn two years old ( I cannot believe it)!  We have lots of fun in store for you all week long.  We kicked things off today with a feature of all of designers picking their two favorite projects that they've created for Practical Scrappers.  I had a terrible time picking (but I did narrow it down to three).  Hey, I when you've created over a hundred projects ( I think my actual count was 147 not including what's in store for this week) you try to pick only TWO!
This card was created for a birthday party that we went to this weekend.
cardstock:  The Paper Company
pattern paper:  Crate Paper Snow Day Collection
Ink: Martha Stewart
Stamp: Scrappy Cat "Happy Birthday"
Ribbon: Offray
Tools: Paper crimper, Fiskars large scalloped circle punch, McGill cupcake punch, Fiskars paper crimper 

Some things to look forward to during the week, a Challenge ME Tuesday "BINGO" board challenge, an online recipe challenge with new items being added each day then having two hours to complete and put the finishing touches on at the end of the week, some speical appearance and projects created by past design team members, and to end our week we have a special PS design team blog hop with lots of chances to win RAK's.  The blog hop begins on Friday at 12:01 am and end Sunday at 11:59 pm EST! 
Thanks for stopping in!

Monday, July 25, 2011

Circle Shape Cards!


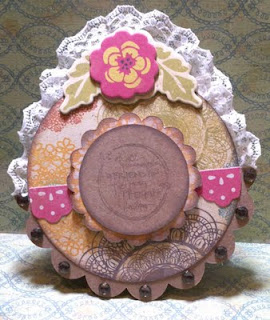
I saw a card like this awhile ago and thought it was the greatest thing ever! Well, it just so happens that today we were having a feature at Practical Scrappers using circles in cards. It gave me the chance to try our my own version of what inspired me. Whether your card be circle shaped, circles on your paper, embossed circles, whatever....just as long as circles are involved we wanted to to see what you had that was "a- round".
So I designed this card using my Gypsy (Storybook and Plantin Schoolbook carts).
Basically, all there is to this the base is a scalloped circle (folded in half 5.5". The circle is 4.75". The next scalloped circle is 3.5" and the inside circle is 2.5".

Product List:
Cardstock : Kraft--The Paper Company
Pattern Paper: Restoration Collection --Crate Paper
3-D Embellies & border stickers: Restoration Collection-- Crate Paper
Stamp: Precious Friend-- Kolette Hall
Ink: Chocolate--Martha Stewart
Bling: Studio 18
Lace
Gypsy (Plantin Schoolbook & Storybook cartridges)
Cricut Expressions


Thanks for stopping in and happy scrappin'!

Tuesday, July 19, 2011

Wood Grain Paper

Today at Practical Scrappers is the "Challenge Me Tuesday" feature and this weeks challenge was wood grain paper. This was one type of paper I did not own (can you believe it). So, me being the practical lady I am, I made my own using Ranger alcohol inks and some glossy cardstock. I used the earth tone colors carmel and ginger as well as my blending tool and solution. It's not my best card but I've been playing around with my alcohol inks on the side and this is the first project I am willinto put on my blog...hehe! I also used the alcohol ink (ginger) to change my white vinyl thickers to brown with some texture. The image I stamped is actually a cuttlebug embossing folder that I inked up and stamped with. What can I say, I was having all kinds of fun experimenting.

Thanks for stopping in!

Monday, July 18, 2011

Creating the Perfect Bow!

I was introduced to this wonderful blog a little while back from "Red", Karen, at SAS when I hosted a little online crop and she created this beautiful bow on one of her cards. Her little secret was this blog called "The Amazing Paper Grace". Becca create her own little peg bow maker to help create her perfect bows every time. I finally got around to making my own peg bow maker. Now I changed mine up a little different from her directions, but that was because I found some decorate shelf brackets on clearance for $1.97 each, the other piece I wood I stole from scraps lying around in the garage, and the dowel was in the closet, all hardware and paint was on hand as well. So bottom line this cost me $3.94 to make and it is work every penny.
I have one less hole than Becca did (my piece of wood was smaller), but I can create bows from  1 inch up to 5 1/2" inches.  I used my husbands drill with the spade to do my holes.  The other thing that was different was since I used shelf brackets all I had to do was add 1 screw on each side ( I used a 3/4" wood screw) and lined it up with the slot on the bracket.  For those of you who have never used shelf brackets before the tighter you put your screw into the wood (wall) the tighter the fit it will be (which means it won't wobble side to side).  Finally to finish it up I gave it a two coats of my favorite color (purple) spray paint which was left over from mother's days projects I did two years ago.   I can honestly say this is one of the best tools ever-- now more uneven bows for me!
To check out Becca's process here's the link again... also she has some fabulous tutorials listed on her blog on how to create different bows using your peg bow maker!

Thanks for stopping in!

Single Layer Card

Today at Practical Scrappers we are featuring some single layer cards. This challenged me and was a first attempt not to layer pattern paper after pattern paper. I am in the process of preparing for fall/winter craft fairs and this is note card set I created (envelopes and all) that are 3 1/2" x 3 1/2". I used two different stamps on this and kept it simple with just two different inks as well. I also made the folder (which is behind the card) to hold both my note cards and envelopes for easy display at the craft fairs.

cards and folder (closed)


card and folder (open)


Thanks for stopping in and make sure you head by Practical Scrappers to check out the other single layer inspiration!

LinkWithin

Related Posts with Thumbnails