Tuesday, December 14, 2010

Christmas Tree Tutorial & A Santa Layout!

I created a tutorial for my article today at Practical Scrappers. Thought I should also post it on my blog here as well! Hope you can follow along wasy enough, my video tutorial that I made was not uploading from the camera card to the computer.

Now these little trees can vary in sizes and you will always need to start with a square (6x6, 7x7, 8x8, 8.5 x 8.5, 12 x 12 are the sizes that I have done them). The supply list that I am going to give to you is based on starting with 12x12 piece of cardstock (for smaller sizes you will need less).

The Supply List(pictured above):

paper trimmer

hot glue gun

packaging tape or some other heavy clear tape

1- 12"x12" piece of solid cardstock (neutral colors--whites, beige, kraft--I just used green because I have a lot of it right now)

2 - 12" x 12" pieces of double-sided pattern paper

1 -3"x3" square piece of same pattern paper ( decrease this square if you make a smaller tree...example 8 1/2"x8 1/2" or 8"x8" make this a 2"x2" square)

paint brush

pencil

string (13" long)

bling, other embellishments, glitter glue, glitter to decorate your tree

Tie your piece of string to your pencil. You will want your string to be 12 inches long after you've tied it to the pencil ( or whatever size your cardstock was to start with). Holding the end of the string at bottom left corner of the 12"x12", extend your pencil to the upper left corner. While holding the string in place at the bottom left draw an arc from the upper left corner to the bottom right corner.
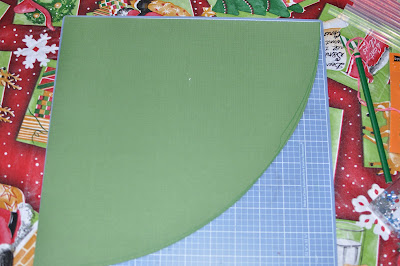

Cut paper along the arc that you drew.


Butt-up the two sides to meet, tape with heavy packaging tape to form a cone. This takes a little playing with to get the cone shape because the paper naturally wants to form a tear drop shape. I tape on the inside and outside of the seam keep my cone shape.


This is what your cone will look like.

Now using your paper cutter, cut your two sheets of pattern paper to 3/4"x3" strips of paper. I cut all my strips to 3/4" x 12" first them cut them down to the 3/4"x 3".


Curl your strips of 3/4"x3" paper around your thin paint brush (you can also use a pencil or something else round). I prefer a thin paint brush because I can get a tighter curl out of it.


Using your hot glue gun ( you could use other adhesive, but I prefer my hot gun because of the "instant stick" and you strips don't slide around), start applying your strips working all the way around the bottom then moving up. I have 23 strips on my bottom row.


I like to alternate my pattern paper on the rows when curling my pattern paper to make it more interesting. I end up with 8 rows on tree that I started with 12"x12" cardstock; 6 on one that started with 8 1/2" x 8 1/2". Once you've finished curling all your strips of pp, you will want to create a cone with your 3"x3" piece of paper the same way you created the base to your tree. This will become the top of your tree and hide the top that did not get covered with your strips.


Decorate your tree with acrylic gems, stickles, or other embellishments to finish off your tree.


Here's my tree placed on top of my Christmas tree as tree topper.
While I'm in the Christmas mood here's a LO I completed of my kids at Lunch with Santa from last year. Now, I can scrap this years pictures!


Have a great day and thanks for stopping in!

Saturday, November 13, 2010

My First Video Tutorial!

I've opened a new chapter in my scrapbooking this week! Today I finished my first ever craft show-- it went OK! Kind of slow, but I have another next weekend as well...keep your fingers crossed for me! Trying to raise money to send my son to Cananda!
I also stepped away from doing step by step picture tutorials and created my very first video tutorial! I think it turned out pretty well! Let me know what you think!


Thanks for stopping in!

Thursday, October 21, 2010

It's BoBunny Time!

Today at Practical Scrappers we are starting a new feature. Each month you will see us featuring a different paper manufacturer and looking for submissions. This month we are featuring one of my favorites, definitely my new favorite and it's what I'm on a kick using right now (especially since I won their entire Whooli-gans Collection off thier facebook page)! WOO HOO! But here in this LO, I used another favorite line, Jazmyne. I just love purple and green together! This line was perfect for these Easter pictures I've have waiting to scrap since 2009, but couldn't find that perfect paper for it!


Supply List:
Eggplant cardstock
Jazmyne Mist pp--BoBunny
Jazmyne Wellspring--BoBunny
Lavendar Garden Rub-Ons (I used them on my photos and also to create my title "My Little Chicks")
Jazmyne iCANDY brads--BoBunny
Studio 112 pearl bling
American Crafts Ribbon

Thanks for stopping in! Make sure you head over to Practical Scrappers to check out some other BoBunny inpspiration!

Wednesday, October 20, 2010

Want to Win a GYPSY????

The very crafty Cristal "Pinky" Hobbs, whom I used her pattern for to create my own SVG in the project posted below, is a member of the Provocraft Cricut Circle Magazine Design Team. They gave her a Gypsy to give away to celebrate the launch of of the new Cricut Circle Blog. Just head over to her blog to check it out! Just become a follower, leave a post, and tell your friends for a chance at this!

Good Luck to all who enter!

Wednesday, October 6, 2010

Think Pink!!

October is Breast Cancer Awareness Month and to help promote that The Cuttlebug Spot, one of my former design teams, has a challenge this week to support it! They decided to take inspiration from the colors (pink) and the theme (strength, love, hope, faith) of the month.

Here's what I came up with!


The ever so clever, Cristal "Pinky" Hobbs,came up with this cute bra and panty card back in 2008! I love this card and have used it many times, but this time I decided to create my own SVG from it to save me the leg work of hand cutting. Now I have the SVG file, to use with my cricut anytime I want! Thanks Cristal, as always, for your ever craftiness!
I used some Creative Memories Fashion Diva paper, my Swiss Dots embossing folder, wire, pink lace I got on clearance for 25 cents for a roll of 9 ft, a little piece of American Crafts pink ribbon, and I small flower with bling.

Thanks for stopping in! Check back tomorrow too-I should finally have up all my creations from my weekend crop!

Kerri

Sunday, October 3, 2010

Newest Projects!

I haven't posted on my blog now for two weeks, guess I've just been too busy creating and doing the "real life" to get to it! Anyway, these were my projects for the the last two weeks at Practical Scrappers!
This was my project for the Stamp Challenge:

*what I did*
On this LO, I used the Stampin' Up 4x5 "Canvas" background stamp to create the matting behind her photo. Then I stamped with my Versa Mark then heat embossed with black embossing powder. I also used another Stampin' Up stamp (from Looks Like Spring Collection) to create the background on my yellow cardstock.

This was the my project from the Ribbon Challenge:

*what I did*
Recognize those papers? I was being practical and immediately used the scraps left over from my button LO project last week to create my card for the ribbon challenge. I went a little ribbon crazy this week and you might have a hard time telling. First, I used blue gross grain ribbon to create some separation down the center that she then hand-stitched some red floss down the center to draw the eyes in. Then I used some red yellow checked self-adhesive ribbon to create a layer of matting behind the digi stamp, "Love Ewe", from our Semptember sponsor, Robyn's Fetish. Next, I used that same ribbon to create a bow in the center of my card. And finally, I balanced off the left corner with a ribbon flower she created with the two different ribbons I used on this card. Was that enough ribbon for you?

Just a reminder, this week we start an entire new format at Practical Scrappers and I cannot wait! You can head over there already to see the new look, but tomorrow will bring about the change to a "magazine style". Be sure to check out our "Current Calls" page (last tab) to see what's coming up! Hope to see all of you submitting!

Thanks for stopping in!

Kerri

Tuesday, September 14, 2010

Buttons Galore!!

This week's challenge item at Practical Scrappers is buttons! FOr our challenge this week, I wanted to step away from the regular old round buttons and add some fun by mixing it up with some decorative shape buttons that I got out of the clearance bin at Joann's for 50 cents for the 6 of them! I used my buttons to as a way to embellish my tree (like they were leaves or falling apples). Also, I decided to create a hidden journal tag behind my pictures and use the buttons as way to easily grab the tag and side it out to read!

Here's my LO:


Thanks for stopping in! Oh, and don't forget about the new changes coming to Practical Scrappers you can check out the blog here or you can scroll down to the post below to read more about it!

Kerri

Monday, September 13, 2010

Have You Heard The News??

Practical Scrappers is going to have a new free magazine style format beginning in October. We are seeking project submissions for the following topics and will be featuring some of the great work that comes our way. In your email please include a link to your blog, if you have one, and tell us what country or state you live in.

Layouts Submissions can be sent to practicalscrapperslayouts@gmail.com
*Layouts that use five or more photos
*Layouts that use black and white photos
*Layouts that use distressing techniques


Cards Submissions can be sent to practicalscrapperscards@gmail.com
*Cards that use distressing techniques

We will also be looking to feature great projects from our message boards. Make sure you head on over to our message board and become a member there. You will find a LO gallery, card gallery, and even a place to feature altered projects. No theme or guidelines for that, just share your great work with us!

Wednesday, September 8, 2010

White/Color Core Challenge @ Practical Scrappers.

This week's challenge is one of my favorite products to use mostly because I am such an addict to my Cuttlebug and all the cool techniques I can do with. White core and color core cardstock are so fun to use they can make your projects looked finished and sometimes even create more elegance.

Here's my project for this week:

I used Core'dinations color core (orange) cardstock that I embossed with the daisy folder in the With Gratitude combo pack. I then sanded it down with an emery board to reveal the light orange core. Also, you can see that I have been having a blast with my Copic markers coloring images, and they do do not disappoint! I actually feel like an adult doing all this coloring and blending now!

This month's sponsor is Robyn's Fetish at Practical Scrappers. Here's a little bit about Robyn's Fetish and More...
Robyn's Fetish Digital Stamps And More is proud to sponsor Practical Scrappers for the month of September.
Robyn's Fetish Digital Stamps And More, a division of I Did It Creations,
was created and is owned by Robyn Weinrib.
Robyn offers a wonderful variety of digital stamps and digital papers, designed to meet the needs of all digital paper crafting addicts for every occasion.
Robyn's Fetish Digital Stamps And More is happy to offer the winner of this challenge 5
digital stamps or digital paper sets of their choice.

The digital stamp I used is one of Robyn's creations called "Daisy Days"...you can check out more her stuff by clicking here

Thanks for stopping in!

Kerri

Wednesday, September 1, 2010

White Pen Challenge @ Practical Scrappers!

Here's my project for this week:

A simple little card I did using a digi stamp from our September sponsor, Robyn's Fetish, called "A Little Birdie Told Me". I used my white pen to doodle on the bird after I coloring with my copics and I used the white pen to create my sentiment.

Also, I have a LO I just finished up the other day for the Treasure Hunt going on at Treasured Scrapbooking. My project was eliminated so I can share it now! The hunt is a lot of fun and it's the second year I've done it now-- I always love the challenges they come up with. I will continue do the challenges even though I didn't make the cut just to play along. This LO also shows you how you can use your white pen on a LO so it fits in nice with this post!


Thanks for stopping in!
Kerri

Tuesday, August 31, 2010

At The Fair....

This is a bitter-sweet project for me....it's going to be my last at The Cuttlebug Spot. New design call starting next week and I don't think I have it in me to reapply. I've had a summer of "hell" with the tragedy that has struck us and right now I want to re-focus and get back to loving my scrapping rather than doing it to complete a project.

So here it is...the final one as a DT member (I will definitely be playing along once I get back into the swing of things)for a theme At The Fair:


This week's randomly chosen winner will receive a $50.00 gift certificate to Simon Says Stamp!

Monday, August 23, 2010

Oh Baby!!

This week it's all about those bouncing bundles of joy at The Cuttlebug Spot. Now I created a LO this week and I put a pic of my son on it. But, this is actually for my newphew Logan who is going to be baptized on September, 12th (I'm going to be his godmother). I did it all is stars, browns and greens to match his bedroom because I am going to frame it so it can be hung there.

What I used...
Cuttlebug Stars Embossing Folder
Stampin' Up Chocolate Chip cardstock
Stampin' Up Kraft cardstock
DCWV pattern paper (from baby stack)
SCAL 2.0 with Cricut to cut title font "Twinkle Star" and star embellies
Fancy Pants Little Star Collection Stamps (Little Star and stars on circle)
Momento Rich Cocoa Ink
*I must also give credit to the very talented Erin Moorehouse who is a fellow DT member with me at Practical Scrappers who created the fabulous sketch I finally got around to doing!*


TO enter this week's chance for $20.00 gift certificate at Custom Crops just create your own baby project and make sure to include embossing. You have until Saturday, August 27th, 9pm PST to enter for your chance to win!

Thanks for stopping in!

Kerri

Sunday, August 22, 2010

New Projects I Haven't Shared!

Behind again on the blog, but here's what I've been up to recently for both Practical Scrappers and The Cuttlebug Spot....not gonna type a lot, but I do want to share!
This was from a challenge that was going on at PS for our 1 yr anniversary....our Book Lover's Challenge where we had to quote from our favorite book. My favorite new series is the Dark Hunter Series and the quote I used was from the book, "Acheron", said by Acheron.

This one here is a LO of me from my wedding day. IT was also from our 1 year anniversary week where the challenge was to use the number 1 on Wednesday of that week on our projects.

This project was our weekly challenge after the 1 year anniversary week where we had to use summer themed stuff on on projects...I used some old beach pics, Reminisce water paper, Karen Forester's crab paper clip, some shell chipboard stickers for embellies (I know there's something I'm forgetting but cannot remember what?).

This was this pasts weeks challenge at Practical Scrappers. Stitching was the challenge at hand, and boy, was it ever a challenge for me. I broke both of my sewing machines in the process :) of trying to complete this card. I don't see myself machine stitching for a long time now. I'm going faux from no on!!

And last here is the project from The Cuttlebug Spot. After a two week vacation from the spot and a much needed rest for all of us there we came back with our weekly challenge and kicked it off with sympathy cards which is a tough one for me. I don't do a lot of sympathy cards so I struggled with this one, but in the end it turned out good.


Stop back in tomorrow and I will have my project for The Cuttlebug Spot this week posted for ya and stay tuned for Wednesday and I'll have my project from Practical Scrappers up! I just got my Copic Markers and I used them on my project this week! WOO HOO!

Kerri

Monday, August 2, 2010

Happy 1 Year Anniversary Practical Scrappers~ WITH RAK!

Lots happening this week over at Practical Scrappers! A brand new challenge each day with prizes to help celebrate our one year anniversary of our blog. Be sure to stop in daily to check out the new challenge plus the projects everyone create. You may even see some of the old faces throughout the week making guest appearances. We've gone back and invited all of our former designers to join in on the celebration and help create projects to share with all of you this week.

Also, make sure you head on over and become a new member of message board if you aren't already. The celebration doesn't stop on the blog-- we are having an online crop Friday, August 6th until Sunday, August 8th (11:59pm EST). There will be games and of course more challenges to keep this party going! But, you must be a member of the forum and a follower of the blog to join in.

I feel I need to help celebrate with our party so I'm giving away a present! Leave me a comment here letting me know the following:
1.) you've posted about about one year blog anniversary and online crop on the Practical Scrappers message board
2.)where you've posted about our celebrations (other message boards your own blog)
3.)if you will be joining us for some challenges during the week on the blog or the crop!

I have a prize package of $50.00 of scrappy goodies (including a brand new fall stack of paper) that will go to one random winner!

Thanks for stopping in!
*TOOT TOOT* that was my birthday horn blowing!

Kerri

Friday, July 30, 2010

This Week's Projects!

I am behind on loading up my projects with losing both of my grandfathers in a months time. We buried one on July 17th, and now turned around and buried the other on Monday. I've been on one heck of a roller coaster ride this summer and cousin of the family said it best to me, "When it rains it pours, but at least is summer and it cools you off." Thanks god it is summer because I'm not sure I'd be able to handle it all if it wasn't.

Anyway here is my project from the Cuttlebug. This week's challenge was to create a mini album. I created an album of my daughter's princess makeover from our Christmas trip to Walt Disney World. Now, if you look at the Cuttlebug Spot Blog, you'll notice a different picture. That's because I didn't have it finished when I had left for my grandpa's funeral, but now it's all done!


This project is from Practical Scrappers weekly project. We had to use at least 7 different items on our project.I used 12 different items on this calendar.
Here's my list
chipboard for the backing
3 different pattern papers
cardstock (red and black)
a strawberry acrylic stamp by Studio g
Martha Stewart markers
Stazon on jet black ink
Red chalk around the image
tulle to hang it from
adhesive back ribbon
red bling by Studio 18
foam Thickers for the year
strawberry digital stamp by this month's sponsor Digi Doodle


Don't forget you have until Saturday to enter both of these fabulous challenges!

Thanks for stopping in!

Kerri

Tuesday, July 20, 2010

It's Christmas in July!

This week at The Cuttlebug Spot we are celebrating Christmas in July! I know, some of you don't even want to think about it, but you know it's never to early to be inspired and get some fresh ideas for the holiday.

Here's my card:


PP- Hot of the Press (2007)
Cardstock- DCWV and Bazzil
Stamp -Studio g
Ink-Studio g pigment ink
Bling-Studio 18
Cuttlebug Embossing Folders-- Holly (5x7) and Textile (A2)
Ribbon- got it from Big Lots over the holiday in a clearance bin


Stop by and share you Christmas projects with us and remember to use embossing on them. This week's winner will receive a $20.00 GC from Custom Crops.

Thanks for stopping in and happy scrappin'!

Kerri

Wednesday, July 14, 2010

Embossing Challenge @ Practical Scrappers

This is my absolute favorite challenge we have at Practical Scrappers. There is not a machine out there that I enjoy more than my Cuttlebug. Don't get me wrong, I love my Cricut but, it is in a definite second place finish in my book. For this week's challenge I decided I'd share with everyone at Practical one of my favorite techniques to do with my Cuttlebug and Nestabilities that DT leader Nilda at The Cuttlebug Spot came up with and created this fabulous tutorial on how to do that you can check out here.

Here's my project:


The only thing that I do differently from the video is that I do not use the tan mat by Spellbinders. I use what they call Plumbers's Pack that I got from my Lowes (in the plumbing department). I comes in a few different thicknesses I have both 1/8" and 1/16" and it's a 6x6 square. You can buy them individually which only cost me $1.44 for the one piece and $1.19 for the other. Much more cost effective than the $8-$10 on the Spelldinders tan mat. I bought both thicknesses due the different thicknesses of chipboard there are. You have to play around a little bit to figure out which size works best, but once you get familar with it which to use --it's a piece of cake!

Thanks for stopping in! Don't forget to enter your project by Saturday July 17th @ 5pm EST for a chance to win our prize pack of three digi stamps from our sponsor this month Digi Doodle.

Happy Scrappin!
Kerri

Thursday, July 1, 2010

Behind On Posting!

What else is new?? I just keep forgeting to update my blog to share all of my work, so I'm going to do it all here in one post

Here's my design for The Cuttlebug Spot-- we are celebrating the 4th of July this week there-- don't forget you have to use your Cuttlebug on the project! Make sure to stop my and check out all of my DT sisters fabulous inspiration, plus there have been wonderful inspiration in the entries already that you won't want to miss out on checking out!


Here is my design for Practical Scrappers weekly challenge. The weekly challenge there is to use decorative scissors or border punches (or both). I used my "Victorian" style decorative edge scissors to create the photo corners. I also used my MS Double Loop border/corner punch combo set to create the edging on the background paper. Then for some fun, I cut 5 strips of 1 1/2 inch x 7inch paper and used her double loop border punch down each side. I folded the strips in half and added some ribbon and buttons to create the large flower.
Don't forget we have a design team call going on at Practical Scrappers and this weeks challenge will be the last opportunity to join in on one of our challenges before the July 5th deadline. If you've ever considered trying a join a DT, this is a great opportunity and a great way to be practical with the supplies you already have on hand!


Last we have a monthly bonus challenge going on at Practical Scrappers that "yours truly" is the hostess of these fun and unique challenges. I like being known for using items in a way that they aren't meant to be which is partly how this monthly challenge came to be. Christine, our fearsome Practical Leader--love you boss (;, approached me with the idea for it back in April and we've been rolling with for the past two months. I think we've been getting some great entries, and cannot wait to see what everyone does with this month's theme called, "Just Beachy". Pull out those items that you would find at the beach or would take to the beach and use them on your project.
Here's mine:
I used some decorative sand and shells that I had sitting around in vase on this LO.


Thanks for stopping in and I hope you all have a scrappy day!

Kerri

Wednesday, June 23, 2010

Bag IT and Tag IT!

My project this is week is doing double duty for both of the challenge blogs I design for. At The Cuttlebug Spot it is tag week and at Practical Scrappers it is time to use up those flowers.

I created this gift bag for my darling daughter Delaney, who will turn 4 on June 28th. She's having a princess birthday party and this is for the gift that her brothers got her, which she is just going to love-- more silly bands! The pattern for this bag comes from My Scrap Chick in there newer collection of bigger bags! It was a must buy for me!!


upclose of the tag for The Cuttlebug Spot....


Here this front and back of the bag for Practical Scrappers...


Items used...
My Scrap Chick bag SVG cut on Cricut
Cinderella Cut and Emboss Cuttlebug Die
Swiss Dots Embossing Folder
Cinerella papers
Light Blue Bazzil cardstock
White cardstock
Studio g blue ink
cornflower blue and white silk rosettes
Inkadinkado Happy Birthday Stamp
cornflower blue grosgrain ribbon

Thanks for stopping in!

Kerri

Monday, June 14, 2010

The Cuttlebug Spot-- It's LO Week!!

Over at The Cuttlebug Spot this week we are doing another great challenge! We want you to show us how you can incorporate embossing on your layouts. This is one of my favorite things to do-- most people love their bug for cards, I actually prefer mine for LOs. I'm a big fan of adding some texture to my projects and embossing is peferect for that!


On this LO I used two different embossing folders, Swiss Dots and Spider Web. I embossed some iradescent vellum with Swiss Dots on the angel wings. Then I embossed the red photo mat and the half marquee with the Spider Web embossing folder then inked with some black glitter Studio g pigment ink.

Make sure you stop by the blog and check out the rest of my DT sister projects for some more inspiration on how to use your bug on LOs. I will update this post with the prize for this weeks random winner once Nilda posts!

Thanks for stopping in!

Kerri

Thursday, June 10, 2010

Eyelet Challenge at Practical Scrappers!

Here's my design for our challenge this week at Practical Scrappers. I created this little fish bowl card for some fun!

here are the detail on the card and what I used:
DCWV textured cardstock
D'Vine Swirls embossing folder used on the water
Eyelets for bubbles
Dew Drops for pebbles
the fish is on the Everyday Paper Dolls Cartridge (there's a fishing guy on there)
the Seaweed is a Cottage Cutz die
the fish bowl I just drew by hand, cut it out, then outlined with marker

The Grand Prize this week is three digi stamps of your choice from Squigglefly! The contest is open until 5 pm ET on Saturday, June 12th. Have fun and use up some of those supplies!

Kerri

Monday, June 7, 2010

I'm Back.....

At The Cuttlebug Spot! After the month long break there and then having some family things to deal with, finally a new project! Just in time for something new we are featuring. Every second Monday of the month will be a sketch challenge. How fun, huh? I always love a great sketch to work from and you will not be disappointed. Our very talented designer, Amyee Gandy, has created a fabulous sketch for all of us to work with!

here's my take on the sketch....

Product list:
Cuttlebug & D'Vine Swirls Embossing folder
all pp from DCWV Summer 2009 Stack
cardstock-(red and yellow) The Paper Company
Stamps-- Inkadinkado
Ink-- Tsukineko (Versa Magic Dew Drops --red magic, thached straw, and midnight black), and Jet Black StazOn
K&Company Elegance Daisy embellishment
Chatter B.O.X Fabulous Ribbon Collection


Make sure you stop by The Cuttlebug Spot and check out all my other DT sisters projects. I will update with the prize once I see what we offering up!

Thanks for stopping in!

Kerri

Thursday, May 13, 2010

A Girl Can Never Have Too Many Shoes!

Try telling my husband that....well, at least this one that I've created isn't sitting out in the hallway or taking up space on the shoe shelf in the basement. Right now over at P K Glitz, Inc., they are having a challenge to create your own shoe (pattern available and all). This was so much fun!! I've been wanting to create my own shoe for a long time now and this challenge gave me the perfect chance to do so. I've always wanted a pair of the lace-up dress-up (you know like a pair of ballet slippers do). So I created my own shoe that laces up. I used two pieces of 18 gauge floral wire and covered the wire by gluing ribbon on both sides of it. Then the tough part was shaping-- I just added some Becaon's 3-in-1 glue where the two pieces cross over to help hold it's shape! I just loved how it came out! Thanks Jamie for telling me about the challenge ;)


If you've ever wanted to make a shoe, you should definitely head over and check out this challenge--you hve until May 31st to enter!

Kerri

Wednesday, May 12, 2010

Roll With the "Punches"!!

We are rolling with those "punches" this week at Practical Scrappers this week. Dust off those punches, border punches, corner rounders this week and show us how you can inspire us to use them. For my project this week I got my inspiration from Scrapbook & Cards Today's Blog using my Martha Stewart Double Loop Border and Corner punch combo set you can check it out here. One punch to create three different looks and they all are just fabulous!
Also to note on this project: I used an image from our May Sponsor *Wink *Wink Ink, called "Blossom Baby". I took a lot of time to create this one embellishment, because I wanted to try something different with a digi stamp. I getting to be pretty accustomed to Inscape and SCAL 2.0 now, so I have ventured out into "color tracing bitmaps". In other words, counting all the different colors you see in a jpeg image, then separating and creating a layer for each color. I was able to create my own SVG image that I could then cut on my cricut and make this paper piercing that you see. The only thing that I did color was the image of the sleeping baby. I actually printed it on glossy photo paper and was able to blend my markers a bit better, since I don't have any Copics yet :( *sigh*
Ok, so here's my LO:


This is my new nephew Logan, who turned a month old yesterday. I actually gave the LO to my sister on Sunday for her Mother's Day gift. It brought her to tears, which was what I was hoping for!

Thanks for stopping in and make sure you check out all the inspiration from all my design team sisters-- they are all truely inspirational and have really rocked this challenge! Oh, almost forgot-- don't forget to enter your own project for a chance to win some of those fabulous digi images from *Wink *Wink Ink!

hugs,

Kerri

Tuesday, May 11, 2010

Blogger Issues?? Finally Some NEW Projects!!

I don't know about the rest of you, but I have been having so many issues with my blog lately and not being able to post things....I can post on other blogs that I belong to, post comments, but cannot create my own post? Go figure, I gave up trying last week to post the projects I wanted to and decided to finally give it a try again today.

So here's what you've missed that I been up to:

1.) The Cuttlebug Spot is on a well needed break! We are all taking a little vacation and will be back in action on June 1st with some new challenges and surpises for you-- Nilda hasn't even told us yet what she has in store for us so I am super excited!

2) Practical Scrappers Challenges:
Here was last week's sticker challenges


And something NEW at Practical Scrappers!! Each month we will be having a month long challenge that is "out of the norm" from our regular challenges at Practical Scrappers, created by yours truely!

The first challenge for the month of May is going to be called "Recycle, Renew, Reuse". Earth Day has just passed and we are full swing into the season of Spring, otherwise know as the season the renewal, rebirth, and regrowth. Your challenge is to create a project (LO, card, altered item whichever your preference)using a recycled item (cardboard, cereal boxes, popscicle sticks, plastic...etc)on your project to give it a new purpose than what it was intended.
Here is my example:


I have taken an old cassette tape case and altered it to create this "pocket picture purse" (as I call it)for those wallet size photos. I have also used a piece of recycled cereal box to create the accordian fold out for the pictures.


3.) The other things not affilated with design teams:


These projects here were created for my mother and my mother-in-law for mother's day gifts. I handmade each of these roses our of 22lb white copy paper. Each rose is composed of 5- 1" hearts (cut on cricut--Plantin Schoolbook), 6- 1 1/2" hearts, and 5- 2" hearts (only the large center one uses the 2" hearts. I inked them with Versa Magic inks using 2 shades in each color. Then I curled the rounded parts of the hearts using the smallest paint brush I have. The next part is where a lot of patience comes in to play. I attached each heart to a piece of 18 gauge piece floral wire that I folded in half and wrapped that completely with floral tape. Next, using floral tape starting with the 1" hearts in the center and finishing with 2" on the outside start adding your hearts one at a time. If you want a tutorial-- leave me a post here letting me know. I just figured out how to create a video with my camera so I will try and make one if I have enough interest!

Thanks for stopping in! Have a great day and hopefullyy I'll be able to post my project for you tomorrow that will be revealed!

Kerri

LinkWithin

Related Posts with Thumbnails